In the ever-evolving landscape of modern security, access control systems play a pivotal role in ensuring authorized entry while thwarting unwarranted intrusions. These systems are the embodiment of safety and efficiency, transforming spaces into secure sanctuaries. The installation of access control systems hinges largely on comprehensible wiring diagrams, creating a foundation upon which a robust security framework is built. In this guide, we will elucidate the intricacies of the access controller wiring diagram and offer a step-by-step installation process, empowering you to forge your fortress of security.
Before delving into the technical aspects, let’s take a moment to appreciate the inspirations that drive the adoption of access control systems. Whether it’s safeguarding a commercial property, protecting sensitive information, or simply securing a residence, the motivation is universal: a profound desire for peace of mind in a world rife with uncertainties. Understanding the wiring behind these systems is not merely a technical exercise; it is a means to achieving that serenity. Let’s embark on this enlightening journey to unravel the secrets behind effective access controller installation.
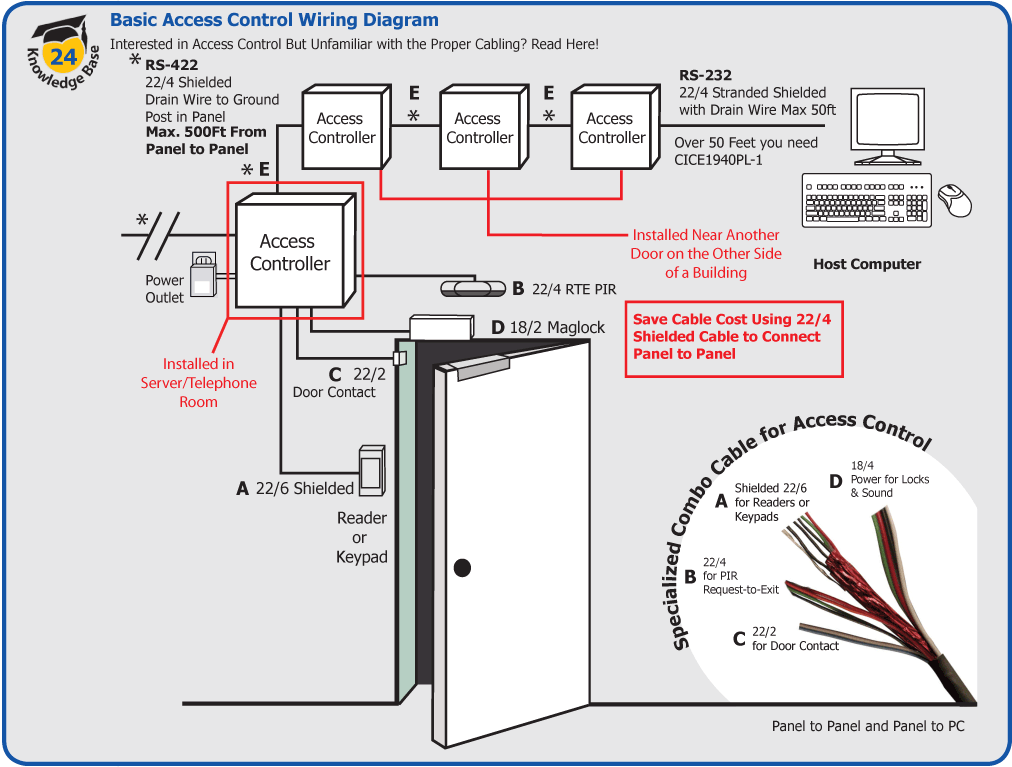
Understanding Access Controllers
Access controllers serve as the brains of any security system, managing entry points and enforcing security protocols. These devices can include electronic locks, key card readers, biometric scanning units, and intercom systems. The wiring diagram acts as a roadmap, guiding you through the labyrinth of connections required to facilitate seamless operation.
The Essential Components
Before proceeding to the installation steps, it’s essential to familiarize yourself with key components: the access controller, power supply, locking mechanism, reader devices, and the wiring itself. Each part plays a critical role: the controller processes credential information, the power supply energizes the system, locking mechanisms secure your space, and reader devices grant or deny access based on predefined parameters.
Preparing for Installation
With a clear understanding of the components, preparation becomes paramount. Begin by gathering necessary tools: wire strippers, screwdrivers, a multimeter, and, of course, your wiring diagram. Ensure you have adequate safety gear—gloves and goggles—to protect against unforeseen mishaps. Selecting a suitable installation location is crucial, as it should afford both accessibility and protection from environmental elements.
Step-by-Step Installation Process
Step 1: Power Supply Connection
The heart of any electronic system is its power source. Referencing the wiring diagram, identify the terminals designated for power supply connections. Carefully connect the positive and negative wires to their respective terminals, ensuring a stable flow of electricity. Employ a multimeter to verify voltage continuity, thereby preventing potential power anomalies later in the system.
Step 2: Installing the Access Controller
Position the access controller at an optimal height for user interaction. This height typically ranges from 40 to 50 inches from the ground. Utilize the provided mounting screws to secure the controller in place. During this phase, double-check the alignment with the wiring diagram once more; clarity here is crucial to avoid miscommunications later.
Step 3: Connecting the Reader Devices
Next, connect the designated reader devices—portable keypads, card readers, or biometric scanners. These devices will often lead to terminal blocks on your controller. Consult the wiring diagram to identify color codes for each connection. Every reader will have a corresponding terminal on the back of the controller; ensure these connections are tight to prevent any discrepancies.
Step 4: Integrating the Locking Mechanism
Once your controller and readers are connected, turn your attention to the locking mechanism. This step can often be the most gratifying, as it symbolizes the final lock on your security framework. Depending on the type of installation, you may opt for electromagnetic locks or electric strikes. Following your wiring diagram, connect the locking mechanism to the relevant terminals on your access controller, ensuring correct polarity and tight connections.
Step 5: Finalizing the Setup
With the primary components interconnected, it’s time to finalize your setup. Double-check all connections, ensuring they are secure and conform to the wiring diagram. Next, restore power to the system and conduct a functional test of each reader device. Confirm that the locking mechanism responds appropriately to authorized access codes, card scans, or biometric requests.
Step 6: Implementation of Security Protocols
Now that your access controller is installed with great precision, it’s imperative to implement your security protocols. This stage includes programming user credentials, defining access levels, and scheduling access times. These measures pave the way for a personalized security strategy that not only secures your premises but also caters to specific needs.
Troubleshooting Common Issues
Even with meticulous installation, challenges may arise. Common issues may include power inconsistencies, reader malfunctions, or programming errors. Utilize your multimeter to assess electrical connectivity and consult the wiring diagram for specific troubleshooting tips. Knowledge is your ally in overcoming these hurdles.
Conclusion
In conclusion, undertaking the installation of an access controller wiring diagram is more than a mere technical task; it is a decisive step towards fortifying your environment against unauthorized access. Embracing this knowledge instills a profound sense of empowerment. Every connection made brings you closer to a secure haven, transforming your inspirations of safety into tangible reality. As you conclude this installation, take pride in your new skills, knowing you have played an integral part in shaping a secure future.