Imagine wielding the power to control machines with a mere flick of your thumb. The exhilarating realm of robotics mingled with the user-friendly interface of joystick technology creates captivating possibilities. As you venture into the exciting world of automated systems, consider the fusion of Arduino technology and joystick controls – a combination that will not only empower you to build extraordinary projects, but also introduce you to the enigmatic domain of automation and electronic engineering.
Arduino, an open-source electronics platform, has burgeoned in popularity among enthusiasts and novices alike. Its simplicity in programming, along with the vast array of compatible components, makes it an ideal choice for embarking on innovative projects. Meanwhile, joystick controllers, often found in gaming consoles, provide an intuitive method for interfacing with mechanical constructs, bridging the gap between human intent and robotic action.
In this article, we will traverse the intricate landscape of building an automated system using Arduino and joystick control. The project we’ll explore is not just a mundane endeavor; it embodies creativity, engineering principles, and the thrilling excitement of bringing an idea to life. From selecting the right components to programming your system, let’s dissect the process step by step.
Understanding the Components
Before diving into the assembly of your automated system, it’s crucial to understand the elements that will coalesce to form your creation. Here’s a brief overview of the primary components you’ll need:
- Arduino Board: The brain of your operation, this microcontroller will handle input signal processing and control the motors. The Arduino Uno is often recommended for beginners due to its user-friendly attributes.
- Joystick Module: This component serves as your interface, allowing you to control the movement and direction of your automated system effortlessly. Look for a joystick with integrated push-button features for added control options.
- Motor Driver: If your automated system intends to facilitate movement, a motor driver such as the L298N is indispensable. This component assists in controlling the direction and speed of DC motors, providing the power necessary to propel your project.
- Power Supply: Consider a battery pack or a power adapter that suits your assembly, ensuring that your components receive adequate voltage without risking damage.
- Prototyping Board and Jumper Wires: These essentials allow you to establish connections between components seamlessly, facilitating a circuit that is both functional and adaptable.
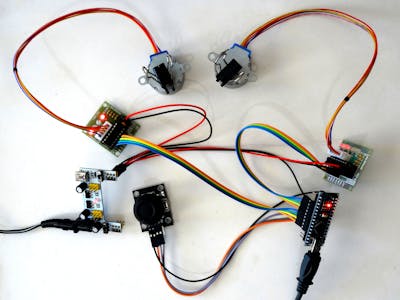
Wiring It All Together
With a clear understanding of your tools, it’s time to tackle the interconnectivity of your components. You will need to wire your joystick module to the Arduino board, ensuring that the appropriate pins are used for power, ground, and signal outputs. Typically, the joystick has two axes of movement (X and Y) that will need to connect to the analog input pins on the Arduino.
Subsequently, wire the motor driver to the Arduino while connecting your motors to the output terminals. The wiring process is akin to threading a labyrinth; therefore, it is prudent to sketch out a diagram before commencing to ensure clarity.
Programming Your Arduino
With your hardware aptly configured, it’s now time to channel your inner programmer. Utilizing the Arduino IDE, write a script that captures the joystick inputs and translates them into actionable commands for your motors. Here is a simplified structure of the script you might consider:
#include  // Include the motor driver library

// Define motor connections
AF_DCMotor motor1(1);
AF_DCMotor motor2(2);

void setup() {
  Serial.begin(9600); // Initialize serial connection
}

void loop() {
  int joyX = analogRead(A0); // Read X-axis
  int joyY = analogRead(A1); // Read Y-axis

  // Map joystick values to motor speed
  int motorSpeedX = map(joyX, 0, 1023, -255, 255);
  int motorSpeedY = map(joyY, 0, 1023, -255, 255);

  motor1.setSpeed(abs(motorSpeedX)); // Set speed for motor 1
  motor2.setSpeed(abs(motorSpeedY)); // Set speed for motor 2

  // Control direction based on joystick position
  if (motorSpeedX > 0) {
    motor1.run(FORWARD); // Move forward
  } else {
    motor1.run(BACKWARD); // Move backward
  }

  if (motorSpeedY > 0) {
    motor2.run(FORWARD); // Move forward
  } else {
    motor2.run(BACKWARD); // Move backward
  }

  delay(50); // Delay for stability
}
The script initializes your motors and reads the analog input from the joystick. It maps the joystick’s output to motor speed and direction, translating your intentions into precise mechanical movements.
Testing and Troubleshooting
Once your program is uploaded to the Arduino, it’s time for the exhilarating moment of truth – testing your automated system. Observe how the motors respond to thumb movements on the joystick. If the reactions are sluggish or incorrect, delve into troubleshooting: check your wiring, verify the code, and consult the community forums for insights.
With persistence, you will undoubtedly conquer the challenges that arise. The learning curve is integral to the journey, transforming a mere hobby into a source of profound knowledge and skill development.
Expanding Your Horizons
As you hone your craft, consider experimenting with additional features such as LED indicators, sensors for obstacle detection, or even connect your system to the Internet for remote operations. The possibilities are expansive, limited only by your imagination and determination. Through embracing the innovative paradigm of Arduino and joystick control, you can evolve from a novice builder into a technological adept, poised to reshape the future.
In conclusion, integrating Arduino with joystick control offers a thrilling gateway into the world of automation. The amalgamation of creativity, technology, and hands-on learning not only fulfills your curiosity, but also cultivates skills that are invaluable in the increasingly digital age. So gather your components, channel your creativity, and embark on the exhilarating journey of building your automated system today!